Mudanças entre as edições de "Aberto:Software - Windows - Capturar Telas com a Ferramenta de Captura"
(R171440) |
m |
||
| Linha 11: | Linha 11: | ||
=== PASSO 1 === | === PASSO 1 === | ||
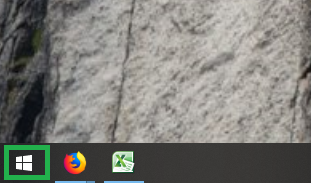
Abra o menu <b>Iniciar </b> | Abra o menu <b>Iniciar </b> | ||
| − | <table style="margin:auto;"><tr><th style="background-color:wheat">Imagem 1</th></ | + | <table style="margin:auto;"><tr><th style="background-color:wheat">Imagem 1</th></tr><tr><td style="padding:0.5em; border: 2px solid navy;"> |
[[File:ClipCapIt-200817-085713.PNG]] | [[File:ClipCapIt-200817-085713.PNG]] | ||
</td></tr></table> | </td></tr></table> | ||
| Linha 17: | Linha 17: | ||
=== PASSO 2 === | === PASSO 2 === | ||
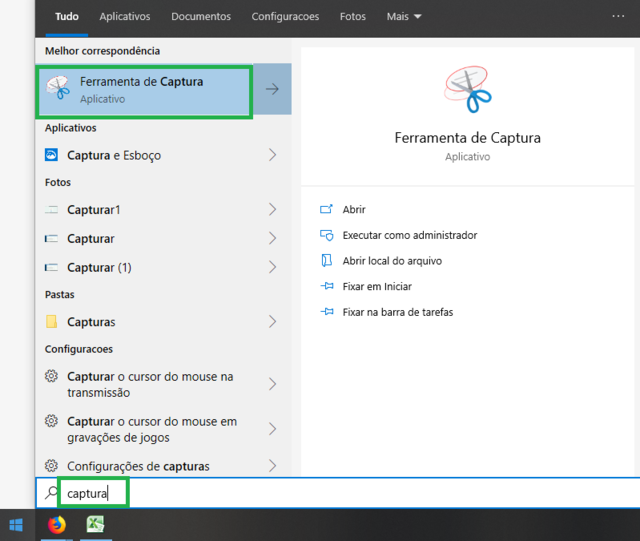
Digite '''captura'''. Nos resultados de pesquisa, irá aparecer a '''Ferramenta de Captura'''. | Digite '''captura'''. Nos resultados de pesquisa, irá aparecer a '''Ferramenta de Captura'''. | ||
| − | <table style="margin:auto;"><tr><th style="background-color:wheat">Imagem 2</th></ | + | <table style="margin:auto;"><tr><th style="background-color:wheat">Imagem 2</th></tr><tr><td style="padding:0.5em; border: 2px solid navy;"> |
[[File:ClipCapIt-200817-083715.PNG|640px]] | [[File:ClipCapIt-200817-083715.PNG|640px]] | ||
</td></tr></table> | </td></tr></table> | ||
| Linha 23: | Linha 23: | ||
=== PASSO 3 === | === PASSO 3 === | ||
Clique em '''Novo'''. | Clique em '''Novo'''. | ||
| − | <table style="margin:auto;"><tr><th style="background-color:wheat">Imagem 3</th></ | + | <table style="margin:auto;"><tr><th style="background-color:wheat">Imagem 3</th></tr><tr><td style="padding:0.5em; border: 2px solid navy;"> |
[[File:ClipCapIt-200817-084059.PNG]] | [[File:ClipCapIt-200817-084059.PNG]] | ||
</td></tr></table> | </td></tr></table> | ||
| Linha 32: | Linha 32: | ||
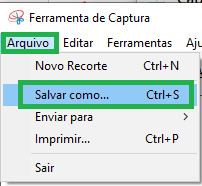
Clique no ícone '''Salvar captura'''[[File:ClipCapIt-200817-084725.PNG|80px]], ou escolha '''Arquivo > Salvar Como'''. | Clique no ícone '''Salvar captura'''[[File:ClipCapIt-200817-084725.PNG|80px]], ou escolha '''Arquivo > Salvar Como'''. | ||
| − | <table style="margin:auto;"><tr><th style="background-color:wheat">Imagem 4</th></ | + | <table style="margin:auto;"><tr><th style="background-color:wheat">Imagem 4</th></tr><tr><td style="padding:0.5em; border: 2px solid navy;"> |
[[File:ClipCapIt-200817-085043.PNG]] | [[File:ClipCapIt-200817-085043.PNG]] | ||
</td></tr></table> | </td></tr></table> | ||
| Linha 39: | Linha 39: | ||
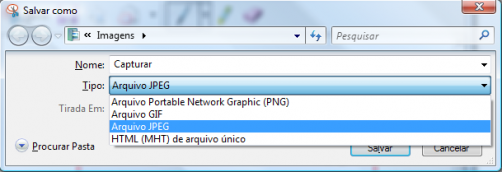
É possível salvar um <b>recorte</b> como um arquivo <b>HTML</b><b>, PNG, GIF, </b>ou<b> </b><b>JPEG.</b> | É possível salvar um <b>recorte</b> como um arquivo <b>HTML</b><b>, PNG, GIF, </b>ou<b> </b><b>JPEG.</b> | ||
| − | <table style="margin:auto;"><tr><th style="background-color:wheat">Imagem 5</th></ | + | <table style="margin:auto;"><tr><th style="background-color:wheat">Imagem 5</th></tr><tr><td style="padding:0.5em; border: 2px solid navy;">[[File:SoftwareWindowsCapturarTelascomaFerramentadeCaptura4.png|center|504x172px]] |
</td></tr></table> | </td></tr></table> | ||
| Linha 51: | Linha 51: | ||
[[Categoria:SAGG v201802 - Software - Orientações]] | [[Categoria:SAGG v201802 - Software - Orientações]] | ||
[[Categoria:Procedimentos com revisão solicitada para Junho de 2023]] | [[Categoria:Procedimentos com revisão solicitada para Junho de 2023]] | ||
| − | |||
Edição atual tal como às 12h34min de 20 de junho de 2022
Para compartilhar esta página, copie e cole as seguintes informações:
- CSWiki | Software - Windows - Capturar Telas com a Ferramenta de Captura
- https://www.trt9.jus.br/cswiki/index.php?curid=10525
Para ir ao Menu Principal, que lista os principais tutoriais destinados ao usuário externo (Advogado, Perito, Parte em Processo ou Outro), clique AQUI.
Objetivo
Procedimento sobre como utilizar a ferramenta de captura de telas do Windows (Ferramenta de Captura ou Snipping Tools).
PASSO 1
Abra o menu Iniciar
| Imagem 1 |
|---|
PASSO 2
Digite captura. Nos resultados de pesquisa, irá aparecer a Ferramenta de Captura.
| Imagem 2 |
|---|
PASSO 3
Clique em Novo.
| Imagem 3 |
|---|
Clique e arraste na área que deseja capturar.
PASSO 4
Clique no ícone Salvar captura, ou escolha Arquivo > Salvar Como.
| Imagem 4 |
|---|
PASSO 5
É possível salvar um recorte como um arquivo HTML, PNG, GIF, ou JPEG.
| Imagem 5 |
|---|
Observações
Em algumas versões do Windows Snipping Tool; em outras, Ferramenta de Captura.
Há uma explicação sobre seu uso em https://support.microsoft.com/pt-br/help/4027213/windows-10-open-snipping-tool-and-take-a-screenshot
Classificação do Catálogo de Serviços (Fevereiro de 2018) > SAGG v201802 - Software > SAGG v201802 - Software - Orientações
Manutenção de Procedimentos > Procedimentos com revisão solicitada, por ano > Procedimentos com revisão solicitada para 2023 > Procedimentos com revisão solicitada para Junho de 2023
Procedimentos adicionados pelo BOT


