Mudanças entre as edições de "Aberto:Sistema - PJe - Assinadores - PJeOffice"
m |
|||
| Linha 1: | Linha 1: | ||
| − | + | Para compartilhar este procedimento, informe a seguinte URL:<br> | |
| − | + | https://www.trt9.jus.br/cswiki/index.php?curid={{PAGEID}} | |
| − | |||
| − | + | ==Objetivo== | |
| − | + | Orientação sobre a forma de instalação e utilização do assinador PJeOffice no TRT9. | |
| − | |||
| − | == | ||
| − | |||
=== PASSO 1 - INSTALAÇÃO === | === PASSO 1 - INSTALAÇÃO === | ||
| Linha 17: | Linha 13: | ||
| − | <table style="margin:auto;"><tr><th style="background-color:wheat">Imagem 1</th></ | + | <table style="margin:auto;"><tr><th style="background-color:wheat">Imagem 1</th></tr><tr><td style="padding:0.5em; border: 2px solid navy;"> |
[[Arquivo:T48083 - print1.png]] | [[Arquivo:T48083 - print1.png]] | ||
</td></tr></table> | </td></tr></table> | ||
| Linha 25: | Linha 21: | ||
| − | <table style="margin:auto;"><tr><th style="background-color:wheat">Imagem 2</th></ | + | <table style="margin:auto;"><tr><th style="background-color:wheat">Imagem 2</th></tr><tr><td style="padding:0.5em; border: 2px solid navy;"> |
[[Arquivo:T48083 - print2.png]] | [[Arquivo:T48083 - print2.png]] | ||
</td></tr></table> | </td></tr></table> | ||
| Linha 34: | Linha 30: | ||
| − | <table style="margin:auto;"><tr><th style="background-color:wheat">Imagem 3</th></ | + | <table style="margin:auto;"><tr><th style="background-color:wheat">Imagem 3</th></tr><tr><td style="padding:0.5em; border: 2px solid navy;"> |
[[Arquivo:T48083 - print3.png]] | [[Arquivo:T48083 - print3.png]] | ||
</td></tr></table> | </td></tr></table> | ||
| Linha 42: | Linha 38: | ||
| − | <table style="margin:auto;"><tr><th style="background-color:wheat">Imagem 4</th></ | + | <table style="margin:auto;"><tr><th style="background-color:wheat">Imagem 4</th></tr><tr><td style="padding:0.5em; border: 2px solid navy;"> |
[[Arquivo:T48083 - print4.png]] | [[Arquivo:T48083 - print4.png]] | ||
</td></tr></table> | </td></tr></table> | ||
| Linha 51: | Linha 47: | ||
| − | <table style="margin:auto;"><tr><th style="background-color:wheat">Imagem 5</th></ | + | <table style="margin:auto;"><tr><th style="background-color:wheat">Imagem 5</th></tr><tr><td style="padding:0.5em; border: 2px solid navy;"> |
[[Arquivo:T48083 - print5.png]] | [[Arquivo:T48083 - print5.png]] | ||
</td></tr></table> | </td></tr></table> | ||
| Linha 59: | Linha 55: | ||
| − | <table style="margin:auto;"><tr><th style="background-color:wheat">Imagem 6</th></ | + | <table style="margin:auto;"><tr><th style="background-color:wheat">Imagem 6</th></tr><tr><td style="padding:0.5em; border: 2px solid navy;"> |
[[Arquivo:T48083 - print7.png]] | [[Arquivo:T48083 - print7.png]] | ||
</td></tr></table> | </td></tr></table> | ||
| Linha 68: | Linha 64: | ||
| − | <table style="margin:auto;"><tr><th style="background-color:wheat">Imagem 7</th></ | + | <table style="margin:auto;"><tr><th style="background-color:wheat">Imagem 7</th></tr><tr><td style="padding:0.5em; border: 2px solid navy;"> |
[[Arquivo:T48083 - print6.png]] | [[Arquivo:T48083 - print6.png]] | ||
</td></tr></table> | </td></tr></table> | ||
| Linha 76: | Linha 72: | ||
| − | <table style="margin:auto;"><tr><th style="background-color:wheat">Imagem 8</th></ | + | <table style="margin:auto;"><tr><th style="background-color:wheat">Imagem 8</th></tr><tr><td style="padding:0.5em; border: 2px solid navy;"> |
[[Arquivo:T48083 - print8.png]] | [[Arquivo:T48083 - print8.png]] | ||
</td></tr></table> | </td></tr></table> | ||
| Linha 88: | Linha 84: | ||
Em caso de dúvidas ou para mais informações, entre em contato com a Central de Atendimento ao Usuário do CNJ: (61) 2326-5353 pje.suporte@cnj.jus.br | Em caso de dúvidas ou para mais informações, entre em contato com a Central de Atendimento ao Usuário do CNJ: (61) 2326-5353 pje.suporte@cnj.jus.br | ||
| − | *Para acesso ao | + | *Para acesso ao PJe Corregedoria é necessário executar o PJe Office. |
== Links externos == | == Links externos == | ||
| Linha 101: | Linha 97: | ||
[[Categoria:SAGG v201802 - PJe]] | [[Categoria:SAGG v201802 - PJe]] | ||
[[Categoria:SAGG v201802 - PJe - PJeOffice]] | [[Categoria:SAGG v201802 - PJe - PJeOffice]] | ||
| − | [[Categoria:Procedimentos com revisão solicitada para Abril de 2023 | + | [[Categoria:Procedimentos com revisão solicitada para Abril de 2023]] |
| − | |||
Edição das 10h41min de 23 de abril de 2022
Para compartilhar este procedimento, informe a seguinte URL:
https://www.trt9.jus.br/cswiki/index.php?curid=13591
Índice
Objetivo
Orientação sobre a forma de instalação e utilização do assinador PJeOffice no TRT9.
PASSO 1 - INSTALAÇÃO
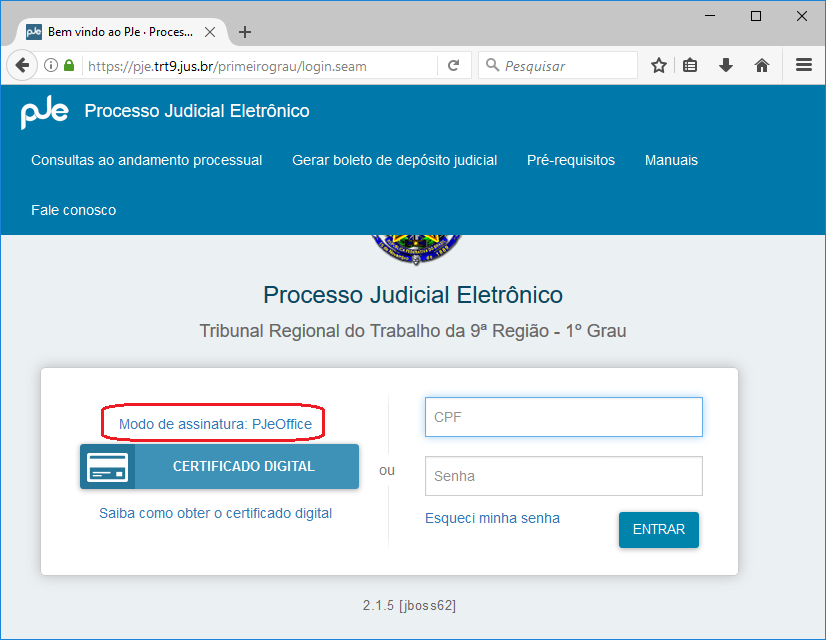
Acessar o site https://pje.trt9.jus.br;
Escolher primeiro ou segundo grau;
Clicar em Modo de Assinatura: PjeOffice.
| Imagem 1 |
|---|
PASSO 1.1
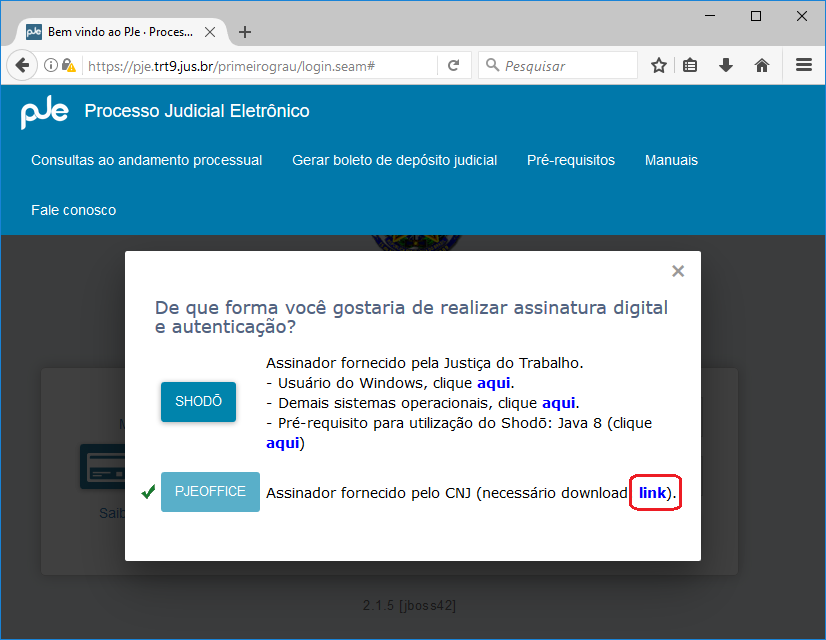
Clicar na palavra Link para redirecionar para pagina de download.
| Imagem 2 |
|---|
PASSO 1.2
Escolher o instalador conforme o sistema operacional instalado no computador.
| Imagem 3 |
|---|
PASSO 1.3
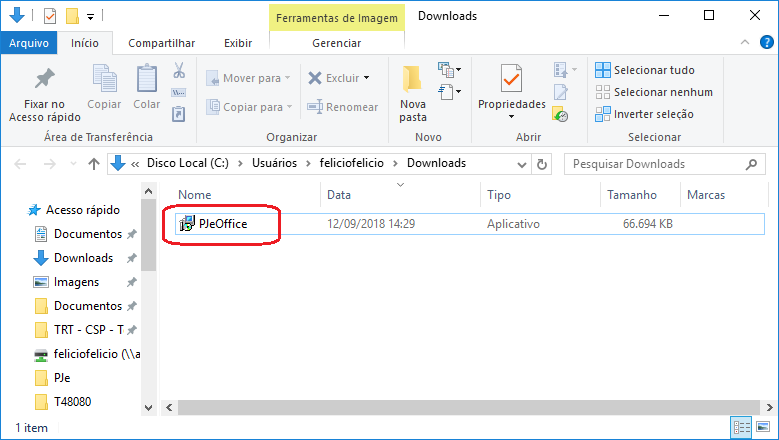
Localizar o instalador na pasta em que foi feito o download e dar dois cliques no executável.
| Imagem 4 |
|---|
PASSO 1.4
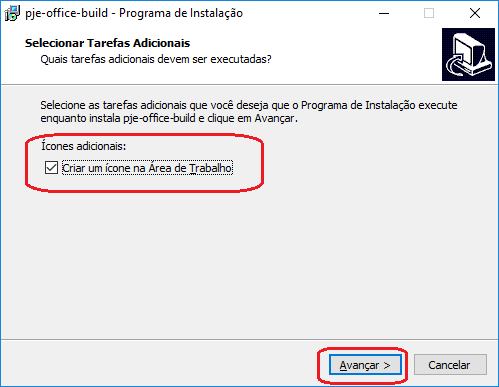
Marcar o opção de criar ícone na área de trabalho e clicar em Avançar.
| Imagem 5 |
|---|
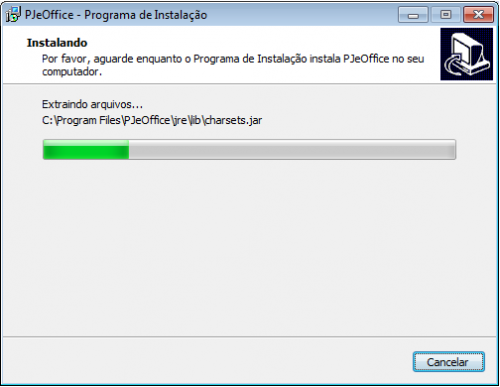
PASSO 1.5
Aguardar a instalação.
| Imagem 6 |
|---|
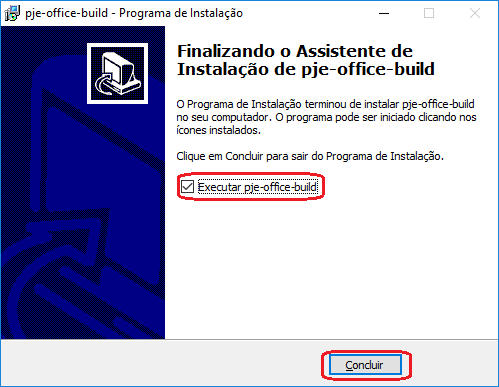
PASSO 1.6
Marcar a opção Executar pje-office-build e clicar em concluir.
| Imagem 7 |
|---|
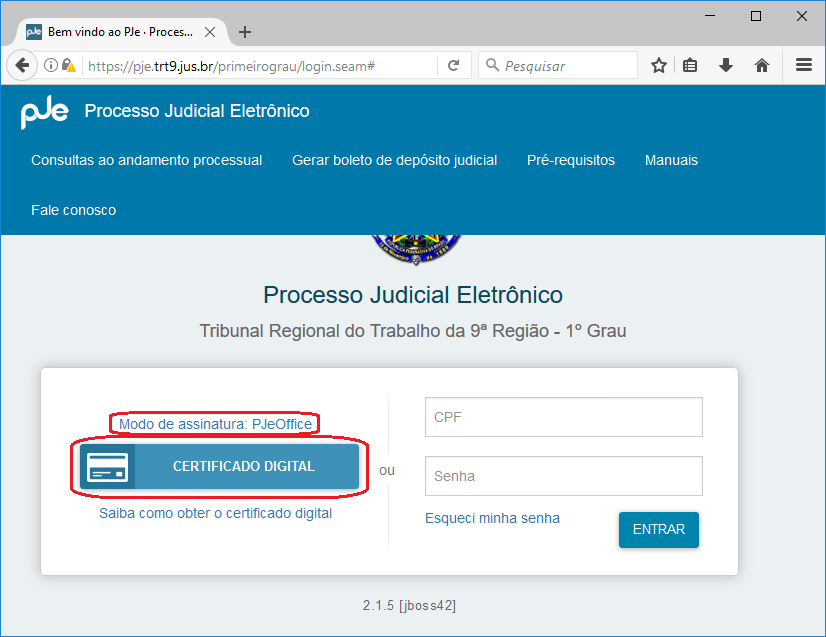
PASSO 2 - UTILIZAÇÃO
Selecionar o Modo de assinatura: PJeOffice e clicar em Certificado Digital.
| Imagem 8 |
|---|
Observação
- Tanto o PJeOffice quanto o Shodo necessitam de Java 8. O problema de compatibilidade do Java 8 com os sistemas legados já foi superado.
- Aos Usuários externos que acionarem o Service Desk buscando informações a respeito do novo assinador deverá ser informado o link para o manual elaborado pelo CNJ, qual seja:
http://www.pje.jus.br/wiki/index.php/PJeOffice
Em caso de dúvidas ou para mais informações, entre em contato com a Central de Atendimento ao Usuário do CNJ: (61) 2326-5353 pje.suporte@cnj.jus.br
- Para acesso ao PJe Corregedoria é necessário executar o PJe Office.
Links externos
- PJeOffice (artigo na MediaWiki do PJe, em https://www.pje.jus.br)
- Guia de instalação do PJeOffice (artigo na MediaWiki do PJe, em https://www.pje.jus.br)
- Shodō (artigo no manual em MediaWiki do PJe no sítio do CSJT)
- Acessando o PJe-JT através do PJeOffice (artigo no manual em MediaWiki do PJe no sítio do CSJT)
- Acessando o PJe através do Shodō (artigo no manual em MediaWiki do PJe no sítio do CSJT)
- Forma de instalação do Shodō (artigo no MediaWiki do PJe do TRT da 23ª Região)
Classificação do Catálogo de Serviços (Fevereiro de 2018) > SAGG v201802 - Sistemas Judiciais > SAGG v201802 - PJe
Classificação do Catálogo de Serviços (Fevereiro de 2018) > SAGG v201802 - Sistemas Judiciais > SAGG v201802 - PJe - PJeOffice
Manutenção de Procedimentos > Procedimentos com revisão solicitada, por ano > Procedimentos com revisão solicitada para 2023 > Procedimentos com revisão solicitada para Junho de 2023
